Tuesday, December 14, 2010

kristi approved choc chip cookies

Chocolate Chip Cookies

Another delicious dessert recipe without the added guilt! Super easy and super yummy. Perfect for those holiday parties.

Ingredients:
1/3 cup brown rice flour
1/3 cup whole wheat flour
2 TB protein powder
1 TB brown sugar
1/4 tsp baking soda
1/8 tsp salt
6 TB no sugar added applesauce
1/4 cup plain canned pumpkin
3 egg whites
3/4 tsp vanilla extract
2 full liquid droppers zero cal-carb sweetener of choice
50 sweetened carob chips

Directions:

1. Preheat oven to 375.

2. In a large mixing bowl, sift all dry ingredients except for carob chips.


3. In a medium mixing bowl, stir all wet ingredients together.

4. Combine all wet and dry ingredients in large mixing bowl. Stir to desired texure. Fold in Carob chips.


5. Spray baking sheet with cooking spray. Spoon batter into 10 evenly spaced circles on baking sheet.


6. Bake in oven for 10 minutes or until edges are crisped.


Makes 10 servings.
Per serving:
Cals: 50
Car: 9
Fat: 1
Pro: 3

Monday, December 13, 2010

smore hot chocolate

S'mores Hot Chocolate

I know. I have issues. A slight addiction to warm chocolaty drinks. I just posted some of my favorite specialty flavors, but this one needed its own post! If you're in the SLC area, you can tune into KSL's Studio 5 this morning and watch me whip this up live. Cross your fingers I don't burn myself or over-do the marshmallows and catch the studio on fire. Not that that would be anything like me...

This drink has all the elements of the toasty fire-side (or oven-side) treat, but in a drinkable form! It's out of this world. Try it in mini-cups for an after-dinner treat or a big ol' mug after playing outside in the cold.

First up, the graham crackers! How do you include graham crackers in a beverage? First dip the rim of your mug in melted butter. I use salted butter because I like how the salt cuts the sweetness of the drink. Then dip the mug in crushed graham crackers.


Gorgeous, right? Next, the chocolate. I'm using a classic Hershey's bar, but you can use any chocolate you like. I personally like using the dark Hershey's bar, cuz that's just how I roll....


Break up those chunks and put them right in your mugs


Now to make the chocolate into hot chocolate, just pour in hot milk. I always use whole milk when I do special drinks like this because, well, it tastes good. And it's kind of naughty. And I'm always secretly jealous of my babies when they get to drink whole milk every day.


Use a pitcher with a good spout on it so you don't mess up your pretty cracker rim. Just pour, don't stir. It's doing magical things in there.

Leave those mugs there and prepare the marshmallows. You can't have a s'more without a toasty marshmallow, right?


Place them on a parchment lined baking sheet. You don't have to line your baking sheet, but it helps in the case you have any marshmallow goo. You shouldn't end up with marshmallow goo, but I'm just sayin...


Place them under a broiler on low heat and sit there and stare at them. Really, don't go anywhere, just stare. I don't care if it makes them feel awkward, you'll be happy you did when you don't start a kitchen fire.

When the marshmallows are done, carefully stir up your hot chocolate. I like to partially stir so I still have some chocolate goo at the bottom to eat. Just like a real s'more.


Top each mug with a couple of marshmallows, and drizzle with chocolate sauce for pizazz. Yes, I just said pizazz.


These are suuuper cute and delicious in mini mugs as well. Bring a tray out after dinner, or for a party and your guests will literally fall at your feet. Tell them to get up and try your amazing hot chocolate.


One other thing I will mention is that this syrup is amazing. I haven't seen it in stores, I've just had it at the coffee shop in my hot chocolate, but if you're a fan you could order some, it's amazing!


S'mores Hot Chocolate
Recipe by Our Best Bites
serves 4

4 cups whole milk
2, 4oz Hershey’s chocolate bars
2 Tbs butter, melted
2 graham crackers, crushed
8 large marshmallows
Chocolate syrup
4 mugs or 8 espresso sized mugs

Place melted butter in a small, shallowdish that’s as large around as your mug. Place crushed graham crackers in another dish of the same size. Flip your mugs upside-down and dip the rimfirst in melted butter and then in the crushed graham crackers. Break the chocolate into pieces and place onehalf bar in each mug. Heat milk to asimmer and then pour one cup into each mug over the chocolate. Set aside.

Place marshmallows on a parchment linedbaking sheet. Place under the broiler inthe oven on low heat. Watch constantlyand remove from oven when toasted and browned.

Stir hot milk mixture to distributemelted chocolate. Top each mug with 2toasted marshmallows and drizzle with chocolate syrup.

Wednesday, December 8, 2010

Oatmeal Dulce de Leche Marshmallow cookies


Oatmeal Dulce de Leche Marshmallow! I'm so into Dulce de Leche, that thick delicious caramel! I've been putting it in everything lately. You could make these with any Oatmeal Cookie recipe, but this time I used a lacy oatmeal cookie. The lacy cookies are really thin and delicate so don't over do the filling. I love this oatmeal cookie recipe because it's chewy in the center and ever so slightly crunchy on the outsides... oh heaven help me. I love these cookies.
Make these small my friends... they are oh so rich! I'm not kidding...for each cookie I used only a teaspoon of batter...


Oatmeal Dulce de Leche Marshmallow Cookie Pies!

Cream: 1 c. soft butter 1 c. brown sugar 1/2 c. white sugar
Beat in 2 eggs one at a time

Stir in 1 tsp. vanilla

Combine 1 1/2 c. flour 1 tsp. baking soda

Mix into creamed ingredients

Blend in 3 c. old fashioned oats


Preheat oven to 350*

Spray cookie sheet with cooking spray

Drop by rounded spoonfuls onto cookie sheet

Press rounded dough, making it flatter, but not too thin.


Bake 8-10 minutes

While cookies are baking, make filling


Filling:
1 can Nestle Dulce de Leche {found in the Spanish food aisle of your grocery store)
Marshmallow Creme

When cookies are cool, spread Dulce de Leche on one side and Marshmallow Creme on the other side (all the way to the edges)
Optional: Melt chocolate bark and drizzle over the cookies.

These are super-rich so truly be careful and don't put too much filling inside or they'll give you sugar overload!

Thanks Jodi my friend! I'm so honored to be able to visit with you and all your friends today!
Robin

Monday, December 6, 2010

PW Italian Meattball Soup

  • Meatballs:
  • ¾ pounds Ground Beef
  • ½ cups Freshly Grated Parmesan Cheese
  • 3 Tablespoons Fresh Parsley, Minced
  • 1 whole Egg
  • 2 cloves Garlic
  • ½ teaspoons Salt
  • ½ teaspoons Black Pepper
  • ¼ teaspoons Ground Oregano
  • 2 teaspoons Lemon Juice
  • SOUP
  • 3 Tablespoons Olive Oil
  • 7 cups Low Sodium Beef Stock
  • 2 cups Water
  • ½ teaspoons Salt
  • 2 Tablespoons Tomato Paste
  • ¾ cups Onion, Chopped
  • ¾ cups Carrots, Chopped
  • ¾ cups Celery, Chopped
  • 1 cup Russet Potato, Chopped (do Not Peel)
  • ½ pounds Cabbage Chopped
  • Grated Parmesan Cheese To Serve
  • TIED IN A CHEESECLOTH BUNDLE
  • 4 Tablespoons Fresh Parsley, Minced
  • 2 whole Bay Leaves
  • 1 teaspoon Peppercorns

Preparation Instructions

To make meatballs, combine all meatball ingredients and mix well. Shape into small balls and chill for 30 minutes.

Gather 4 tablespoons parsley, bay leaves, and peppercorns in a cheesecloth bundle. Tie to secure.

After chilling, heat olive oil over medium-low heat in a heavy pot. Briefly brown meatballs, then remove to a plate. To pot, add beef stock, water, salt, tomato paste, and herb bag. Bring to a boil, then simmer 30 minutes.

Add onion, carrots, celery, and potatoes. Simmer 15 more minutes. Remove herb bag.

Add cabbage and meatballs. Bring to a boil, then simmer 8 to 10 minutes.

Serve with plenty of freshly grated Parmesan cheese sprinkled over the top.

royal icing flooding

Tuesday, January 19, 2010

Royal Icing 102 . . . or 201 . . . or whatever comes after 101

If you've been reading the blog for a while, you might have seen my post titled "Royal Icing 101." This is how I made royal icing for years...and it worked well...most of the time.

Sometimes, though, I had problems with my icing. Some days it looked dull; sometimes the piping cracked; sometimes the flood icing was filled with little holes.

So, I've done some reading and some experimenting and I've made some changes. Who knows...maybe in 6 months, I'll be doing a post called "Royal Icing 103" (or 301, or whatever), but here's what is working for me these days.

Royal Icing
(This will cover 2-3 dozen 3.5 inch cookies in 2 colors; I usually double this recipe.)

4 TBSP meringue powder
scant 1/2 c. water
1 lb. powdered sugar
1/2 - 1 tsp light corn syrup
few drops clear extract (optional)


Combine the meringue powder and water. With the paddle attachment of an electric mixer, beat until combined and foamy.


Sift in the powdered sugar and beat on low to combine. (Do NOT skip the sifting!)


Add in the corn syrup and extract if desired. ( I think the corn syrup helps keep the icing shiny.)

Increase speed to med-high/high and beat for about 5 minutes, just until the icing is glossy and stiff peaks form.


(You should be able to remove the beater from the mixer and hold up and jiggle without the peak falling.) Do not overbeat.

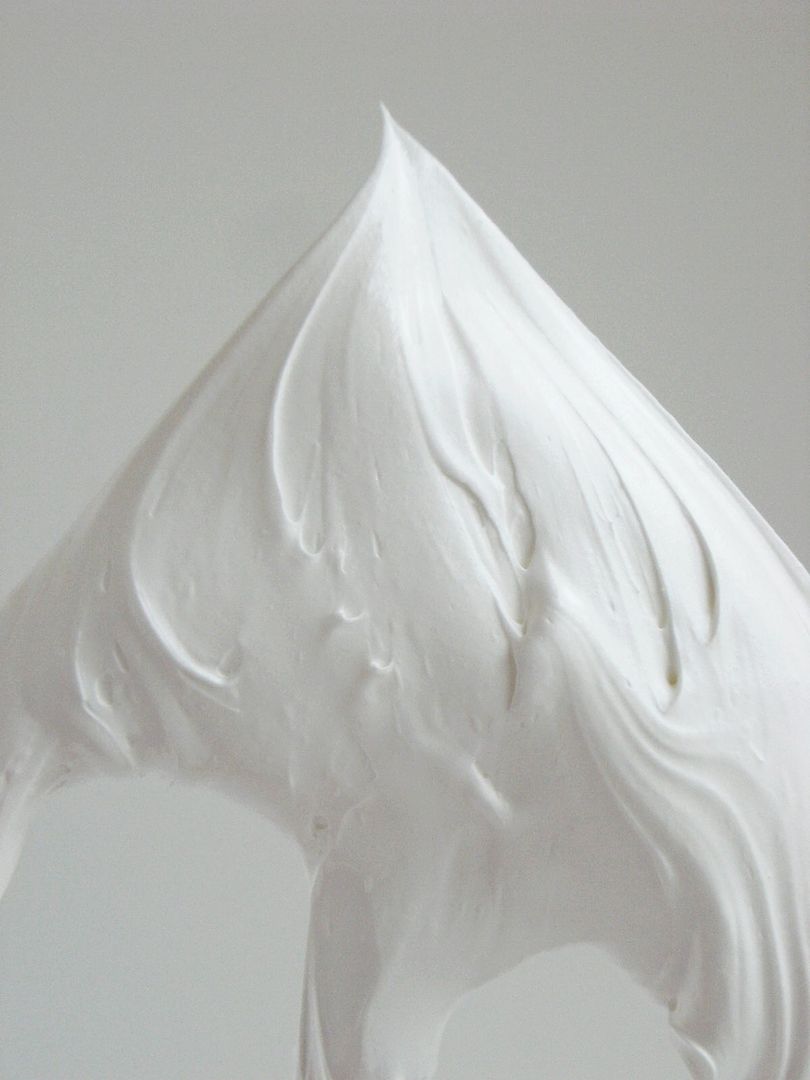
Cover with plastic wrap touching the icing or divide and color using gel paste food colorings.

This "stiff" icing is perfect for outlining and even for building gingerbread houses and monogramming. To fill in your cookies, add water to your icing a teaspoon at a time, stirring with a rubber spatula, until it is the consistency of syrup. This technique of filling a cookie with thinned icing is called "flooding."

Here are some f.a.q.'s regarding royal icing:
{Be sure to check last week's post with cookies f.a.q.'s...I will be updating that post periodically...and check back for next week's troubleshooting post.}

Do you ever add anything to your royal icing to improve the taste (lemon juice, almond extract....?).

Yes, I typically use a few drops of pure almond extract when I am making my vanilla-almond sugar cookies. Just keep in mind that any colored extract, such as vanilla, will tint the icing.

What is a "scant" cup?

It's a measuring cup not filled all the way up to the top. Take a look at the picture above....I took it just for you!

Why does my piped icing...you know...the outline...or maybe just some piping done on gingerbread men...well...why does it dry up and just fall off in little bits.

I think this is from overbeating. It's happened to me, too. Try to beat it until it's glossy and just coming to a stiff peak. Also, use the paddle attachment of your mixer. (This is a really common question...I'll put it in the troubleshooting post as well.)

How do you know the perfect consistency for icing when flooding?

Once your colors are mixed, add water a teaspoon at a time to thin it for flooding. Stir the water in with a rubber spatula, rather than beating it. Hold your rubber spatula over the bowl and let some icing fall back into the bowl. The ribbon of icing should disappear into the rest of the icing in about 2-3 seconds, counting "one-one thousand, two-one thousand."

When decorating wet on wet, how do you do it so the colors don't bleed into one another?

I typically work about 6-8 cookies at a time. I flood all the cookies in the base coat, then go back and add the dots. This gives them a minute or so to rest. It seems to stop the bleeding. Sometimes, it still happens and that's when I have to remind myself not to stress and that it's "just a cookie." (Sometimes a glass of wine helps.)

How exactly do you mix your icing colors when you need several colors and piping and flood?

I divide my icing into how many colors I'll need, whether it's for piping or flooding. (IE...if I need red for outlining and flooding, I make one big container of red.) Then, I tint them with food coloring. If I need a color for both piping and flooding, I go ahead and fill a piping bag before adding the water for flooding. Here's a link with more details on icing prep.

If you make your icing ahead of time, do you separate into flood and piping then or wait until it's time to decorate?

I wait until it's time to decorate.

How do you get your writing to look so even and not slanted?

Practice....lots and lots of practice! And sometimes, it's still crooked! ;) Try practicing on a plate or a piece of wax paper before trying it on your cookies.

Do you have any suggestions for folks like me with not a lot of room to spread out the cookies to dry?

Try stacking your cookie sheets with the drying cookies on top of each other...like some horizontally and some on top vertically allowing some space for air circulation. Does that make sense? The sides of the cookie sheets will support the second layer. You may have to add some drying time here. I've been known to have cookie sheets on every flat surface of my house, including the guest room bed!

I've always wondered...if the cookie is left out overnight, won't it get stale?

Nope, the royal icing needs that overnight time to dry thoroughly and the icing kind of "seals" the cookie from getting stale.

Does royal icing taste as good as cream cheese frosting?

Nope...not in a million years. Cream cheese icing I would eat with a spoon, royal icing not so much. It can taste good, especially if you use Williams-Sonoma, Ateco or AmeriColor meringue powder, but it will never compare to frosting. Make sure you use a sugar cookie recipe that you like. The cookie is the real star here.

Where can I buy meringue powder?

Meringue powder can be found in craft stores and even in the WalMart craft section. The brands that I recommend are normally only found in baking supply stores or online. I recommend Williams-Sonoma, Ateco and AmeriColor. These 3 are vastly superior to the craft store brand in taste and performance.

How do you get the same color, when you made less icing than you needed?

I always try to make more than I need to avoid that problem....otherwise, I really just cross my fingers.

When you make your icing beforehand, do you refrigerate it or leave it out?

Refrigerate it.

How long can you keep royal icing in the fridge before you need to toss it?

I've heard up to one week, but I am never that organized to have it made that early.

In what type of container do you store it (pastry bags or Tupperware or ??)

I put it in Tupperware type containers with plastic wrap pressed down onto the icing to keep it from drying, then with the lid on top of that.

I've always wanted to ask - "the consistency of syrup" - do you mean cheap syrup or real maple syrup? Seriously, I have both and they are so different. Stop laughing at me. I have consistency issues. Stop laughing!

I love this question, Brigid! The consistency of the good stuff. :) (See the question a few above on consistency.)

How do you know for sure when the frosting is dry enough to put more raised-style frosting on top?

I usually wait at least an hour.

How do I make red icing?

AmeriColor Super Red food coloring!!! Here's more info on red icing.

How do I make black icing?

Sunday, December 5, 2010

Lion House Rolls

Lion House Dinner Rolls
2 cups warm water (110-115 degrees)
2/3 cup nonfat dry milk (instant or non-instant)
2 tablespoons dry yeast
1/4 cup sugar
2 teaspoons salt
1/3 butter, shortening, or margarine
1 egg
5-5 1/2 cups all-purpose or bread flour
In large bowl of an electric stand mixer, combine water and milk powder, stir until milk dissolves. Add yeast, then sugar, salt, butter, egg and 2 cups flour.
Mix on low speed until ingredients are moistened, then for 2 minutes at medium speed.
Add 2 cups flour; mix on low speed until ingredients are moistened, then for 2 minutes at medium speed.
(Dough will be getting stiff, and remaining flour may need to be mixed in by hand.)
Add about 1/2 cup flour and mix again, by hand or mixer.
Dough should be soft, not overly sticky, and not stiff. (It is not necessary to use the entire amount of flour.)
Scrape dough off sides of bowl and pour about one tablespoon vegetable oil all around sides of bowl.
Turn dough over in bowl so it is covered with oil. (This helps prevent dough from drying out.)
Cover with plastic wrap and allow to rise in a warm place until double in size, about 45 minutes.
Scrape dough out onto floured board. Turn dough over so it is floured on both sides; gently flatten to about 1 inch thick.
With rolling pin, roll out to a rectangle about 18 inches long, 8 inches wide, and 1/4 inche thick.
Brush with melted butter
With pizza cutter or very sharp knife, cut dough in half to make two strips about 4 inches wide.
Make cuts through strips of dough every 2 inches, making about 18 pieces of dough.
Starting with short end, roll up one piece of dough, with butter on the inside.
Place roll on parchment-lined pan with orther short end down on the paper.
Repeat with remaining pieces of dough. Be sure all rolls face the same direction on baking pan.
Cover lightly with plastic wrap and allow to rise until double in size, about 1 to 1 1/2 hours.
Bake at 375 degrees for 15 to 18 minutes, or until light to medium golden brown.
Brush tops with melted butter. Serve with Honey Butter. Makes 1 to 1 1/2 dozen rolls.
Honey Butter
1/2 cup butter, softened
1/4 teaspoon vanilla
1/2 cup honey
Whip softened butter until light and fluffy.
Add vanilla and honey gradually.
Beat 20 min.
Makes 1 cup

broccooli and cheese stuffed shells

ngredients

Serves: Update

    • 1 container (15 oz.) ricotta cheese
    • 1 pkg. (10 oz.) frozen chopped broccoli , thawed and well drained
    • 1 cup shredded mozzarella cheese (4 oz.)
    • 1/3 cup grated Parmesan cheese
    • 1/4 tsp. ground black pepper
    • 18 jumbo shell-shaped pasta , cooked and drained
    • 1 jar (1 lb. 9.75 oz.) Prego® Chunky Garden Combination Italian Sauce

Directions

1. Stir the ricotta cheese, broccoli, 1/2 cup of the mozzarella cheese, Parmesan cheese and black pepper in a medium bowl. Spoon about 2 tablespoons of the cheese mixture into each shell.

2. Spread 1 cup of the pasta sauce in a 13 x 9 x 2-inch shallow baking dish. Place the filled shells on the sauce. Pour the remaining pasta sauce over the shells. Sprinkle with the remaining mozzarella cheese.

3. Bake at 400°F. for 25 minutes or until hot.

TIP: Time-Saving Tip: To thaw the broccoli, microwave on HIGH for 4 minutes.


Read more: http://www.kitchendaily.com/recipe/broccoli-and-cheese-stuffed-shells-77869/#ixzz17HDh1pZV

Thursday, December 2, 2010

baked potato soup

Ingredients

  • 1/3 cup butter
  • 1/3 cup all-purpose flour
  • 4 cups skim milk
  • 6 large baking potatoes, scrubbed
  • 1 cup sour cream

Directions

  1. Microwave potatoes until done.
  2. While potatoes are cooking make a roux over low to medium heat. Mix butter, margarine, or light olive oil, and flour. DO NOT BURN THE ROUX. When roux is thickened a bit, gradually blend in milk. Continue cooking over low to medium heat while preparing potatoes.
  3. Peel and cut up potatoes. You may want to mash some of the potatoes also. Add potatoes to the milk mixture. Blend in sour cream. Soup is ready to be served.
Add salt, pepper, bacon, green onions, etc

Monday, November 29, 2010

apple cider caramels

If you're scared of making candy, caramels and peanut brittle are a great place to start because they're very forgiving (don't even get me started on toffee's high-maintenance diva behavior). The main things you need are:

1) A heavy pot that is quite a bit larger than the contents of the recipe.
2) A reliable candy thermometer. The good news is that these are inexpensive; think a couple of bucks at Walmart or Target.
3) Lots of oven mitts. Just in case.
4) Patience and undivided attention. Candy-making is not the time to catch up on the life and times of Shiloh Pitt-Jolie.

This caramel recipe starts out like all the others: Sugar, whipping cream, butter, and corn syrup (which is NOT high fructose corn syrup before anyone accuses me of child abuse/mass murder/crimes against humanity). But then we add in apple cider (not alcoholic cider, for our friends not in the U.S.; just the high-quality, fresh-tasting, pressed apple juice) and awesome baking spices:


You really want that concentrated apple flavor, so first, place 2 cups of apple cider into a saucepan and boil it on high until it's reduced to 1/3 of a cup. This will take about 20 minutes, give or take based on how big of a pan you use (the bigger, the faster). Oh, and your house will smell like an amazing little Christmas-y apple factory. This step can be done ahead of time if you'd like.

Place the sugar and corn syrup in a large, heavy pot. Cook on low, stirring frequently, until the candy thermometer registers 234 degrees. In the meantime, cut the butter into cubes (you could just cut it into 8 tablespoons roughly along the markings on the wrapper) and set aside. Combine the whipping or heavy cream with the spices and reduced apple cider. If you taste it, don't be horrified; it doesn't taste great (or good at all. Let's be honest.), but once you mix it with the sugar and butter, it is to die for. After it has cooled, of course. Please don't fall victim to my foolish mistakes.

After the candy thermometer reaches 234 degrees, remove the pan from heat and slowly stir in the whipping cream mixture and then add the chopped butter. Do this carefully (a long oven mitt wouldn't be the stupidest idea here); the mixture may sputter a little. Return the pan to low heat and re-insert the candy thermometer. Cook, stirring frequently, until the thermometer reaches 248 degrees.

While the candy is cooking, line an 8x8" square pan with parchment paper with the paper going up the sides and over the edges of the pan so the candy can be removed easily. Lightly spray it with non-stick cooking spray.

When the candy has cooked, carefully pour it into the prepared pan. Allow the caramels to cool completely on the counter or in the refrigerator.

When ready to cut, lift the edges of the parchment to remove the entire sheet of caramel. Cut the candy into 1/2"-thick strips


And then cut them again in the other direction, making a 1/2"-1/2" candy. Of course, you can always cut these along different dimensions. I'm flexible like that.


Now comes the part I hate. Cut pieces of wax paper into squares or rectangles at least 3 1/2"-4" on each side. Place a caramel in the center of each piece of wax paper...


and roll it up like a Tootsie Roll. Then twist each end. Like a Tootsie Roll.


It's not so bad with the first few caramels. By the end, you will be willing your children to grow just a LITTLE bigger so they can help you wrap these stupid things. If only they weren't so dang delicious. The caramels. Not your children.

These will stay good for a few weeks, especially if you refrigerate them in an air-tight container. They're perfect for holiday gift giving and I guarantee you that you will get phone calls for how to make these if you send them to your neighbors/co-workers/child's teacher.


Apple Cider Caramels
Recipe adapted by Our Best Bites from America's Dairy Farmers

2 c. high-quality apple cider (like Simply Apple)
2/3 c. heavy cream or whipping cream
1 tsp. salt
1 tsp. ground cinnamon
Pinch nutmeg
1/4 tsp. allspice
1 1/2 c. sugar
1/4 c. light corn syrup
1 stick (1/2 c.) real butter, cubed

Pour cider into a medium saucepan and boil on high for about 20 minutes or until the cider is reduced to 1/3 c. (keep a glass or silicone measuring cup handy so you can pour it out and back in again if you need to). Set aside to cool.

Line an 8" square pan with parchment paper, making sure to leave about 1" hanging over the edges for easy removal. Spray with non-stick cooking spray and set aside. In a small bowl, combine the cream, salt, cinnamon, nutmeg, allspice, and reduced apple cider. Set aside.
In a large, heavy saucepan, combine the sugar and corn syrup. Cook over low heat until the sugar dissolves. Insert the candy thermometer and simmer until the syrup reaches 234 degrees.
Remove from heat and slowly whisk in the cream mixture. Add the cubed butter and stir until the cream and butter are fully incorporated. Return the pan to heat and re-insert the candy thermometer. Cook over low heat, stirring frequently, until the temperature reaches 248 degrees.

Remove from heat and pour the caramel into the prepared pan. Let the mixture cool completely at room temperature or in the refrigerator. Cut the caramels into 1/2" squares and wrap each caramel in wax paper. Store in an airtight container or in the refrigerator for up to 2 weeks.

Thursday, November 25, 2010

corn casserole

1 can corn drained
1 can creamed corn
1 cup butter
8 oz sour cream
1-2 tbs sugar (optional)
1 pkg Jiffy cornbread mix
2 eggs
mix together put in greased 9x13 dish
bake 45-55 min at 350

Wednesday, November 24, 2010

fall napkin rings

http://heatherbailey.typepad.com/heather_bailey/2010/11/autumnnapkinringtutorial.html#more

Tuesday, November 23, 2010

martha's simple stuffing

Serves 8

  • 2 loaves Italian bread (about 10 ounces each), torn into bite-size pieces
  • 4 tablespoons butter, room temperature, plus more for baking dish
  • 4 celery stalks, thinly sliced
  • 4 shallots, minced
  • 2 garlic cloves, minced
  • Coarse salt and ground pepper
  • 1/2 cup dry white wine
  • 1/2 cup parsley leaves, chopped
  • 3 large eggs, lightly beaten
  • 2 cans (14 1/2 ounces each) reduced-sodium chicken broth

Directions

  1. Preheat oven to 400 degrees. Arrange bread in a single layer on two rimmed baking sheets. Bake until crisp but not browned, about 10 minutes, rotating sheets halfway through.
  2. In a large saucepan, melt butter over medium heat. Add celery, shallots, and garlic; season with salt and pepper. Cook, stirring occasionally, until vegetables are softened, 5 to 7 minutes. Add wine, and cook until evaporated, 3 to 5 minutes. Transfer to a large bowl.
  3. To vegetables in bowl, add bread, parsley, and eggs. Season with 1 1/2 teaspoons salt and 1/4 teaspoon pepper; stir to combine. Mix in half of broth. Continue to add in more broth just until stuffing is moistened but not wet (there should not be any liquid in the bottom of the bowl).
  4. Just before roasting turkey, stuff it with 4 cups stuffing. Spoon remaining stuffing into a buttered 8-inch square baking dish. Cover with buttered aluminum foil, and refrigerate. When turkey is removed from oven to rest, place covered baking dish in oven, and bake until warmed through, 25 to 30 minutes. Uncover and bake until golden, about 15 minutes more.


Read more at Marthastewart.com: Simple Stuffing - Martha Stewart Recipes

pioneer woman mashed potatoes

Ingredients

  • 5 pounds Yukon gold or russet potatoes
  • 1 1/2 sticks softened butter, plus more for baking
  • 1 1/2 (8-ounce) packages cream cheese, softened
  • 1/2 cup half-and-half
  • 1/2 cup cream
  • Salt and freshly ground black pepper
  • Milk, if needed, for thinning

Directions

Preheat the oven to 350 degrees F.

Peel the potatoes and rinse them in cold water. Chop the potatoes in fourths. Place the potatoes into a large pot and cover with water. Bring to a boil and cook until fork tender, 20 to 25 minutes.

Drain the potatoes, and then return them to the pan. With the burner on low heat, mash the potatoes with a potato masher; the more steam that's released while you mash, the better. Mash for about 5 minutes. Turn off the burner.

Add the butter, cream cheese, half-and-half, and seasonings. Stir to combine, and if the mixture needs thinning, add milk. Check the seasonings, adding salt and pepper, to taste.

Pour the mashed potatoes into a large casserole pan. Dot the surface with butter. Cover with foil and bake in the oven for 15 minutes. Remove the foil and continue baking for 10 more minutes. Serve immediately.

  • A viewer, who may not be a professional cook, provided this recipe. The Food Network Kitchens chefs have not tested this recipe and therefore, we cannot make representation as to the results.

Monday, November 8, 2010

pioneer woman granola bars

  • 2 cups Rolled Oats
  • 1 cup Whole Wheat Flour
  • ½ cups Chocolate Chips
  • ½ cups Peanut Butter Chips
  • ½ cups Brown Sugar
  • ½ cups Wheat Germ
  • 1 teaspoon Cinnamon
  • ½ teaspoons Salt
  • 1 whole Egg Beaten
  • ½ cups Honey
  • ½ cups Canola Oil
  • 2 teaspoons Vanilla Extract

Preparation Instructions

Preheat oven to 350 degrees. Line a 9 x 13 baking pan with foil and spray with cooking spray.

Mix the dry ingredients in a large bowl. In a small bowl, mix together the wet ingredients. Pour the wet mixture into the dry and mix well (it’s easiest to just use your hands). Pat the mixture out into the foil-lined pan.

Bake for about 15-20 minutes if you want chewy granola bars or for 20-25 minutes for crunchy granola bars. When the edges start to brown, remove from the oven and let cool for a couple of minutes. Use a pizza roller to slice into bars. Finish cooling completely before removing from the pan or they will break apart.

Note: you can also substitute dried fruits for the chocolate and peanut butter chips to make these a bit healthier!


granola bars

Deliciously Homemade Granola Bars
Recipe courtesy of The Motherload

2 cups rolled oats
3/4 cup packed brown sugar
1/2 cup wheat germ
1 teaspoon ground cinnamon
1 cup all-purpose flour
3/4 cup mini chocolate chips
1 teaspoon salt
1/2 cup honey
1 egg, beaten
1/2 cup canola oil
2 teaspoons vanilla extract

Preheat the oven to 350 degrees F. Generously grease a 9×13 inch baking pan. In a large bowl, mix together the oats, brown sugar, wheat germ, cinnamon, flour, mini chocolate chips, and salt. Make a well in the center, and pour in the honey, egg, oil and vanilla. Mix well using a wooden spoon. Pat the mixture evenly into the prepared pan. Bake for 30 in the preheated oven, until the bars begin to turn golden at the edges. Cool for 5 minutes, then cut into bars while still warm. I recommend using a plastic knife to cut these out to get a perfectly cut bar with minimal crumbs.

granola bars

Ingredients

  • 4 cups of organic quick cooking oats
  • 1/3 cup organic, cold pressed sunflower or walnut oil
  • 2/3 cup raw honey
  • 1 teaspoon vanilla extract
  • 1/2 cup organic chocolate chips or carob chips
  • 1 cup chopped organic walnuts or pecans
  • 1/2 cup organic dried cranberries

Instructions

  1. Grease a 13 x 9 pan.
  2. Preheat the oven to 350F.
  3. Toast the oats on an ungreased cookie sheet for 15 minutes, stirring often.
  4. Cool to room temperature.
  5. Combine the remaining ingredients in a mixing bowl.
  6. Add oats.
  7. Spread in the pan and press down firmly.
  8. Bake 25 minutes, or until golden brown.
  9. Cool and cut into bars of the desired size.

No Bake Granola Bars with Chocolate Chunks

This organic chocolate chip granola bar recipe is full of chunks of chocolate and has the added energy and flavor of peanut butter. Best of all, you won’t have to bake it.

Ingredients

  • 1/4 cup organic peanut butter
  • 1/4 cup turbinado sugar
  • 1/4 cup raw honey
  • 1 tsp vanilla
  • 1 tsp cinnamon
  • 2 cups organic oats
  • 1 cup organic crispy rice type cereal
  • 1 cup organic chocolate chunks

Instructions

  1. Grease a 13 x 9 inch pan.
  2. Heat the honey, turbinado, and peanut butter to a boil. Boil for two minutes.
  3. Remove from heat and add the rest of the ingredients, stirring to coat all.
  4. Press firmly into the prepared pan and cool.
  5. Cut into bars.

Coconut and Chocolate Chip Granola Bars

The addition of organic coconut not only adds flavor to these bars, but it helps to keep them moist and chewy.

Ingredients

  • 4 1/2 cups organic rolled oats
  • 1 cup organic all-purpose flour
  • 1 teaspoon baking soda
  • 1 teaspoon vanilla extract
  • 2/3 cup organic butter, room temperature
  • 1/2 cup honey
  • 1/3 cup organic sugar
  • 1 cup organic coconut
  • 2 cups organic chocolate chips

Instructions

  1. Grease 13x9 inch pan.
  2. Preheat oven to 325F.
  3. Mix all ingredients and press into the pan.
  4. Bake for 20 minutes, or until golden brown.
  5. Cool for 10 minutes and cut into bars.
  6. Allow to finish cooling completely.

Storing the Homemade Granola Bars

Your homemade granola bars should be fine at room temperature. Keeping them in the refrigerator will cause them to lose some of the crispness. To store them, just cut into bars and wrap tightly in plastic wrap for individual servings. You can also keep them in an airtight, food grade container on the pantry shelf. The bars should keep for up to a week in a cool, dry place.

Sunday, November 7, 2010

carne asada

Authentic Crockpot Carne Asada Meat

I've nursed a mad craving for authentic taco meat ever since visiting a hole-in-the-wall cantina in SoCal this summer. The family and I scooted ourselves tightly under round metal tables, bowing our heads over corn tortillas dripping with tender, savory meat. Gosh sakes, those tacos were good. Good enough to make me think about them twice a day and four times on Friday nights. Good enough to send me scouring the internet for truly authentic tasting carne asada meat. Good enough to get me tossing all of those found recipes away, trying to hone in on the ideal recipe all by my lonesome. Here is the first recipe I've concocted thus far to make the cut. It's not quite taqueria perfect, but it's pretty darned close. (And so, so ridiculously delicious).

1 (3-5 pound) cut of cheap beef

flap, london broil, flank or roast all work beautifully

1/2 cup limeade

1/2 cup white vinegar

1/4 cup oil

1 onion

4-5 garlic cloves

1 jalapeno

2 tablespoons Knorr Mexican beef boullion (granulated)

1 (7 ounce) can Embasa Salsa Verde Green

1 teaspoon cumin

1 tablespoon chili powder

Early in the morning, place your meat in a large crockpot. In a blender, combine limeade, vinegar, oil, onion, clovers, jalapeno, boullion, salsa, cumin, and chili powder. Blend until well pureed. Pour the sauce over your meat, making sure it's well coated (the meat doesn't have to be entirely submerged, just nicely coated with the sauce). Cover crockpot with a lid, and cook all day on low heat. After allowing the meat to cook 8-10 hours, shred the meat, then return it to the crockpot. Stir it in the pan juices and allow it to continue cooking until it's ready to be served. Spoon over corn tortillas, top with grated cheese, homemade salsa or pico de gallo, and sour cream. Es Muy Bien!

Friday, November 5, 2010

cranberry bread

Make-a-Cake Series: Cranberry Cake with Warm Vanilla Butter Sauce

.
Have you noticed my newest sponsor, Ucreate's Holiday Boutique, found here?
Kari over at Ucreate is once again hosting her holiday boutique from Nov. 29th to Dec. 4th. She has rounded up incredible shops and sites that will be showcased all in one spot, and will offer special Ucreate discounts to be used for your special holiday shopping. How convenient! (And if you're interested in joining on as a vendor, click on the above link for more info.)


Looking for the Much Ado About You giveaway? Scroll down or click here.
(Also, the 10% discount off all orders is valid until Nov. 12th.)
. . . . . . . . . . . . . . . . . . . . .


Thanksgiving is coming.
Do you feel it?
I have the perfect holiday dessert for your guests.
It's also perfect to bring with you and impress your mother-in-law! ha ha

Cranberry Cake with Warm Vanilla Butter Sauce


Looks really good right?

My grandmother made this every Thanksgiving while growing up.
She also made hundreds of servings for the Masonic Lodge Christmas Party.
And then again, just for me, when we sat together decorating her Christmas tree.
Such a sweet lady.


I love using cranberries.
I love the bright red color they bring. They add the perfect tartness to this cake.
Then you warm up the vanilla butter sauce and drizzle it over.........Mmmmm, it balances the tart with a rich, warm sweet taste.

It's delicious and looks so festive.


I'm sure many of you have had this or make it yourself. But if you haven't.......do not miss out!
You'll love it.

This recipe came from my Grandma and you know how recipes go that get passed down.......you never know where they came from. (Who knows......you may have the same one.)


Ingredients
Cake:
2 cups all-purpose flour
3 teaspoons baking powder
1 teaspoon salt
3 tablespoons butter, melted
1 cup granulated sugar
2 eggs, beaten
1 cup milk
2 cups fresh cranberries


Sauce:
1 cup butter
2 cups sugar
1 cup cream or half-and-half
2 teaspoon vanilla extract

Candied Cranberries:
1 cup water
1 cup sugar
remaining cranberries 1-2 cups


Preheat your oven to 350.
Mix together all cake ingredients but the cranberries.
Start with the dry ingredients and then add the wet ingredients.
After your cake batter is combined (don't over mix) fold in your cranberries.


Divide into greased loaf pans.
You can use 1 large and two small like me or two large loaf pans or a large 9x13 glass pan.


Bake for 25-30 minutes until a toothpick comes out clean.
The smaller pans will bake faster.

After baking, let cool for 5 minuntes in the pan. Invert the cakes from the loaf pan onto a cooling rack.
If you used a 9x13, just let it cool in the pan.

This cake is served room temperature. The sauce will bring the warm element.


Make your sauce.
Combine all ingredients in saucepan over medium low and cook 10 minutes or until sugar is melted, stirring frequently.

After the sauce cools a bit, I put it in a squeeze bottle for drizzling.
You can find them with candy making supplies. (I bought mine at Micheal's.)


(Hint: You can make the cake and sauce the day before you serve it.
After the cakes cool wrap them up in plastic wrap for the next day. Make your sauce and then keep it in the fridge in Tupperware or squeeze bottle. Then reheat in microwave before serving.)


Candied Cranberries

Before I serve the dessert, I candied up some cranberries for garnish. I just used the left over cranberries from baking the cake and used the same cooking method as I did from THIS post.

Add the sugar and water to a pan and simmer the cranberries for 10 minutes.
Mine didn't keep their round shape but still made a great garnish.


Plating your Cake

Slice the small loaves and plate them with 3 of the slices together.
Then heat up your sauce and drizzle all 3 slices with plenty of the sauce........and place a few candied cranberries on/around the cakes for garnish.


Or you can serve it family style, on a big platter, by slicing up your large loaf.

Then everyone can take a slice. Or maybe 2.....I know they will want more!
(Ok, this picture was taken with my small loaf slices, but you get the idea right?)

Monday, November 1, 2010

Cream of Chicken with Wild Rice Soup

Chicken and Wild Rice Soup

1 chopped onion
2 chopped carrots
3 celery stalks, chopped
1/2 c butter
2/3 c flour
6 c chicken broth
2 packages Wild Rice with seasoning (like Rice a Roni or Far East brand)
2-4 chicken breasts, cooked and chopped
2 c half and half
1 t salt
1 t pepper

saute onions, carrots, celery and butter together in a pot until soft
add flour and stir until veggies are coated
slowly add chicken broth until the flour is completely dissolved
cook the wild rice as directed on package. Add to soup with chicken
Slowly add half and half. Season with salt and pepper

Wednesday, October 20, 2010

corn chowder with chiles

Here is The Pioneer Woman’s Recipe:

Corn Chowder with Chilies
Ingredients

* 2 slices Bacon, Cut Into 1/2-inch Pieces (or Smaller)
* 2 Tablespoons Butter
* 1-½ whole Yellow Onion, Diced
* 5 ears Corn, Shucked (about 4 Cups)
* 2 whole Chipotle Peppers In Adobo Sauce, Finely Diced
* 1 whole 4-ounce Can Diced Green Chilies
* 32 ounces, fluid Low Sodium Chicken Broth
* 1-½ cup Heavy Whipping Cream
* ½ teaspoons Kosher Salt (more To Taste)
* 3 Tablespoons Corn Meal OR Masa
* ¼ cups Water

Preparation Instructions

(Carefully) slice the corn kernels off the cob. Set aside.

Add bacon pieces to a pot or dutch oven over medium heat. Cook for a couple of minutes. Throw in diced onion and stir, cooking the onion for 3 to 4 minutes. Add butter and melt. Add corn. Stir and cook for one minute. Add both kinds of chilies and stir.

Pour in chicken broth and cream. Add salt. Stir and bring to a boil. Reduce heat to low.

Combine cornmeal (or masa) with water. Stir to combine, then pour into the chowder. Cover and cook for 15 minutes over low heat. If chowder needs more thickening, add another tablespoon of cornmeal mixed with water. Cook for another ten minutes.

Serve with crusty sourdough bread or in a bread bowl. Absolutely yummy!

Sunday, October 17, 2010

apple cider doughnuts


Apple Cider Doughnuts
adapted from Diana’s Desserts
serves 24

SPECIAL EQUIPMENT: You will need a mini bundt baking pan with 6 or 12 cavities or a 6 or 12 cavity doughnut baking pan.

approximately 3 tbsp sugar for baking pans
baking spray
2 cups all-purpose flour
1½ tsp baking powder
1½ tsp baking soda
½ tsp salt
2 tsp ground cinnamon
½ tsp grated nutmeg
1 large egg, lightly beaten
2/3 cup packed brown sugar
½ cup apple butter
1/3 cup pure maple syrup
1/3 cup apple cider
1/3 cup plain yogurt
3 tbsp oil

ICING (optional)
1 cup confectioner’s sugar, sifted
1-2 tbsp apple cider

Preheat oven to 350*.
Brush cavities of a mini bundt pan or doughnut pan with oil or baking spray.
Sprinkle with sugar, shaking out excess.
In a mixing bowl, whisk together flour, baking powder, baking soda, salt, cinnamon and nutmeg; set aside.
In another bowl, whisk together egg, brown sugar, apple puree, maple syrup, cider, yogurt and oil.
Add dry ingredients and stir just until moistened.
Divide the batter among the prepared mini bundt pan or doughnut pans, filling only about halfway up the pans.
Bake for 10 to 15 minutes, or until the tops spring back when touched lightly.
Loosen edges and turn the doughnuts out onto a rack to cool.
If required, clean the pans then re-coat it with oil and sugar.
Repeat with remaining batter.

TO MAKE THE ICING
Combine confectioners sugar and 1 tbsp of apple cider in a small bowl.
Mix until the icing is of a drizzling consistency. If not, add more cider.
Dip the tops of the donuts in the glaze.
Return to a wire rack to allow icing to set.

Red Onion Potato and Goat Cheese Pizza

The sweetness of red onions is tempered by tangy goat cheese in this carb-lover's pizza. Use any color fingerling potatoes you like—blue or purple varieties are particularly dramatic.

Prep Time: 40 minutes
Yield: 6 servings (serving size: 2 pieces)

Ingredients

  • 7 ounces fingerling potatoes (about 5 potatoes)
  • 1 teaspoon olive oil
  • 1 medium red onion, cut into 1/2-inch-thick slices
  • 1 (13.8-ounce) can refrigerated pizza crust dough
  • 2 tablespoons cornmeal
  • 1 cup (4 ounces) shredded part-skim mozzarella cheese
  • 3/4 cup (3 ounces) crumbled goat cheese
  • 1 garlic clove, minced
  • 1 1/2 teaspoons fresh thyme leaves

Preparation

1. Preheat oven to 450°.

2. Place potatoes in a saucepan; cover with water. Bring to a boil. Cook 10 minutes or until just tender; drain. Cool slightly; cut potatoes crosswise into 1/4-inch slices.

3. Heat olive oil in a large nonstick skillet over medium-high heat. Add onion to pan, and sauté 8 minutes or until tender.

4. Roll dough out on a lightly floured surface to a 14 x 10–inch rectangle. Sprinkle cornmeal over a large baking sheet; place dough on baking sheet. Sprinkle mozzarella evenly over dough. Arrange potatoes and onion over mozzarella; top evenly with goat cheese and garlic. Bake in lower third of oven at 450° for 15 minutes or until browned. Sprinkle with thyme; cut into 12 pieces.

Nutritional Information

Calories:
314
Fat:
10.3g (sat 4.9g,mono 3.7g,poly 0.6g)
Protein:
14.4g
Carbohydrate:
39.8g
Fiber:
1.8g
Cholesterol:
22mg
Iron:
2.4mg
Sodium:
599mg
Calcium:
173mg

Thursday, October 14, 2010

vegetarian taco salad

Ingredients

  • 2 tablespoons extra-virgin olive oil
  • 1 large onion, chopped
  • 1 1/2 cups fresh corn kernels (see Tip) or frozen, thawed
  • 4 large tomatoes
  • 1 1/2 cups cooked long-grain brown rice (see Tip)
  • 1 15-ounce can black, kidney or pinto beans, rinsed
  • 1 tablespoon chili powder
  • 1 1/2 teaspoons dried oregano, divided
  • 1/4 teaspoon salt
  • 1/2 cup chopped fresh cilantro
  • 1/3 cup prepared salsa
  • 2 cups shredded iceberg or romaine lettuce
  • 1 cup shredded pepper Jack cheese
  • 2 1/2 cups coarsely crumbled tortilla chips
  • Lime wedges for garnish

Preparation

  1. Heat oil in a large nonstick skillet over medium heat. Add onion and corn; cook, stirring, until the onion begins to brown, about 5 minutes. Coarsely chop 1 tomato. Add it to the pan along with rice, beans, chili powder, 1 teaspoon oregano and 1/4 teaspoon salt. Cook, stirring frequently, until the tomato cooks down, about 5 minutes. Let cool slightly.
  2. Coarsely chop the remaining 3 tomatoes. Combine with cilantro, salsa and the remaining 1/2 teaspoon oregano in a medium bowl.
  3. Toss lettuce in a large bowl with the bean mixture, half the fresh salsa and 2/3 cup cheese. Serve sprinkled with tortilla chips and the remaining cheese, passing lime wedges and the remaining fresh salsa at the table.

Tips & Notes

  • Make Ahead Tip: Prepare through Step 1, cover and refrigerate for up to 3 days; reheat slightly before serving.
  • Kitchen Tips: To remove corn kernels from the cob, stand an ear of corn on its stem end and slice the kernels off with a sharp, knife.
  • To cook rice, bring 1 cup water and 1/2 cup long-grain brown rice to a boil in a small saucepan. Reduce heat to low, cover, and simmer at the lowest bubble until the water is absorbed and the rice is tender, about 40 minutes. Remove from the heat and let stand, covered, for 10 minutes. Makes 1 1/2 cups.

Nutrition

Per serving: 395 calories; 17 g fat (5 g sat, 5 g mono); 20 mg cholesterol; 52 g carbohydrates; 0 g added sugars; 14 g protein; 9 g fiber; 459 mg sodium; 774 mg potassium.